| |
Sub-Accounts
|
| |
|
| |
|
| |
What
are Sub-Accounts? |
| |
You can create a Sub-Account on any folder in your online backup account to provide access to files/folders within that folder, to associates. A Sub-Account has access to all IBackup features except the main account's profile and is restricted to the folder assigned to it.
Visit Sub-Accounts page for more information. |
| |
 |
| |
|
| |
How
do I create a Sub-Account? |
| |
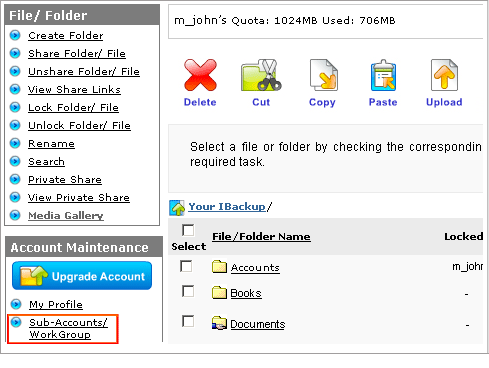
To create a Sub-Account, login to your IBackup account and click the ‘Sub-Accounts’ icon. |
| |
|
| |
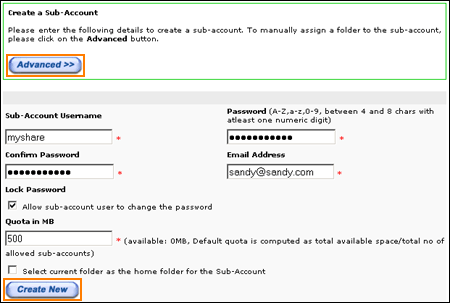
You can either assign your IBackup account or any folder in your online account as the home folder (using the ‘Advanced’ button). |
| |
|
| |
|
| |
|
| |
How do I edit a Sub-Account? |
| |
Login to your IBackup account from the web and click the ‘Sub-Accounts’ icon. Under ‘Action’ click the edit icon to change the password, email address or quota of the Sub-Account and click the 'Save Changes' button. |
| |
|
| |
|
| |
Can I set a password lock for my Sub-Accounts? |
| |
Yes. While creating a Sub-Account, you (main account holder) can clear the
'Allow Sub-Account user to change the password' check box to prevent the Sub-Account user to change the current password. You may also do so after creating the Sub-Account (Sub-Account > Action > Edit icon > clear the ‘Allow Sub-Account user to change the password’ check box). |
| |
|
| |
|
| |
How do I provide 'restricted' access to the Sub-Account holders? |
| |
Suppose that you want to provide access to data within your account to two associates such that Associate 1 has access to all data except two folders (say cash records and employee records) and Associate 2 has access to only two folders (say Correspondence and Maintenance).
First, create a Sub-Account for Associate 1, say Secretary1. Create a top-level folder called Secretary1. Keep all your folders under Secretary1 except those to which you do not want to give access. Define Secretary1 as the home folder for Secretary1 Sub-Account.
Next, create a folder, say Associate 2. Map this folder as home folder to provide access to Associate 2, say Secretary 2. Under this folder, move the two folders (Correspondence and Maintenance). You can now provide access to this Sub-Account (Secretary2) to the other associate.
Deleting a Sub-Account does not delete its contents. In the above example, in case you delete the Sub-Accounts Secretary1 and Secretary2, the contents or data are not deleted or lost. |
| |
|
| |
|
| |
How do I create Sub-Accounts for read-only access? |
| |
Login to your IBackup account from the web and click the ‘Sub-Accounts’ icon.
Click Create New Sub-Account >Advanced Button > select the 'Read-Only (Restricts permission to file download)‘ check box'.
To modify the permission of an existing Sub-Account to ‘Read-Only’, under ‘Action’ click the ‘Edit’ icon and select the 'Read-Only (Restricts permission to file download)‘ check box'. |
| |
|
| |
|
| |
How do I add/remove Sub-Accounts to/from my existing plan? |
| |
Login to your IBackup account from the web and click the ‘Sub-Accounts’ icon. Click 'Add/Remove Sub-Accounts' on the Sub-Accounts page. You can add up to 100 additional Sub-Accounts at USD 5/Sub-Account/month. The charges are applicable from the first day of the next month.
Note: This feature is not available for free trial users.
You can also remove Sub-Account(s) but not the ones that come by default with your plan. |
| |
|
| |
|
| |
How do I delete a Sub-Account? |
| |
To delete a Sub-Account, login to your IBackup account via the web and click 'Sub Accounts'. Click the 'Delete' icon under ‘Action’ to delete the account. Deleting a Sub-Account does not delete the data or the data in the Sub-Account. |
| |
|
| |
|
| |
Is it possible to group Sub-Accounts? |
| |
Login to your IBackup account via the web and click the ‘Sub-Accounts’ icon. Select the Sub-Accounts that you wish to group and click 'Add to Group'. You can add them to an existing group or create a new group. By default, the Sub-Accounts are not grouped.
To view the Sub-Accounts under each group, click the name of the group. To delete a group, click 'Delete group'. All the Sub-accounts under this group are ungrouped. You can also move a Sub-Account from one group to another. |
| |
|
| |
|
| |
How do I execute department wide backups using Sub-Accounts? |
| |
Here's an illustration that details how to execute department wide backups using Sub-Accounts.
Say you need to backup 5 workstations, with 2 GB per workstation. First create a master account through IBackup's registration for 10 GB. Next, create 5 Sub-Accounts through Web-Manager, say sub1, sub2...sub5 using the 'basic' option that automatically creates top level folders with the same name as the Sub-Account name and maps the Sub-Accounts to the respective top-level folders.
Ensure that you allocate quota for the Sub-Accounts appropriately (say 2 GB for each Sub-Account). Each Sub-Account will have its own username and password. Now download the scheduling application IBackup for Windows use respective Sub-Accounts to login to IBackup and set the schedule parameters.
You can manage the entire backup of your department's workstations using one master account for easier control of data, space and billing. |
| |
|
| |
|
| |
What is the best way to create Sub-Accounts when the directory structure is large? |
| |
The best way to create Sub-Account on a folder is to navigate to the folder within Web-Manager and click 'Sub-Accounts'. |
| |
|
| |
|
| |
How do I set the home directory of a Sub-Account to be a folder within a folder? |
| |
Login to your IBackup account via the web. Browse to the folder on which the Sub-Account needs to be created within Web-Manager. Click 'Sub-Accounts' and follow the directions. |
| |
|
| |
|
| |
How do I view the status of the backup jobs for the Sub-Accounts? |
| |
If you are the main account holder, you can view the activity logs and backup status report of all your Sub-Accounts.
Login to the your IBackup account via the browser and click the 'Sub-Accounts' icon. Under ‘Report’, you can view the scheduled backup reports or logs of all activities performed in a browser session via Web-Manager |
| |
|
| |
|