MS Exchange Brick-Level Mailbox Backup
Quick, secure and reliable backup of your emails; easy scheduling options for backup;
restore mailboxes.
IBackup's Exchange Brick-Level Mailbox Backup allows you to backup/restore individual mailboxes on the MS Exchange Server Store to your IBackup account. The application backs up the contents of the selected mailbox (es) to the Personal Folder (.PST) file. The emails from the Personal Folder (.PST) file can be restored to your MS Exchange Server Mailbox, using the IBackup Exchange Brick-Level Mailbox restore feature.
'Exchange Brick-Level Mailbox Backup' is designed only to backup/restore individual mailboxes for the selected mailbox stores and is not a method for the complete backup or recovery of the Exchange database. For a complete Exchange database backup to ensure Exchange recovery, use the 'Exchange Server backup/restore' feature.
Features
- Online backup of individual Mailboxes for the selected Mailbox stores without interrupting the running MS Exchange Server services.
- Backups can be scheduled for a future day and time with various scheduling options.
- 256-bit AES encryption on transfer and storage with a user-defined key that is not stored anywhere on IBackup servers.
- Email and Desktop notifications on completion of backup.
- Session based logs of backup activities.
To perform a brick-level backup,
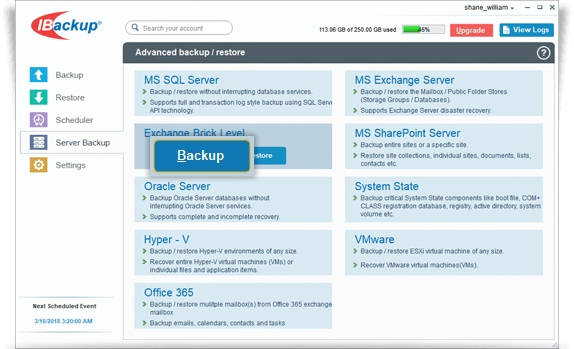
- Login to the IBackup application and click the ‘Server Backup’ tab.
- Under Exchange Brick Level section, click 'Backup'.
- Select the mailbox(es) that you wish to backup to your IBackup account from the MS Exchange Server.
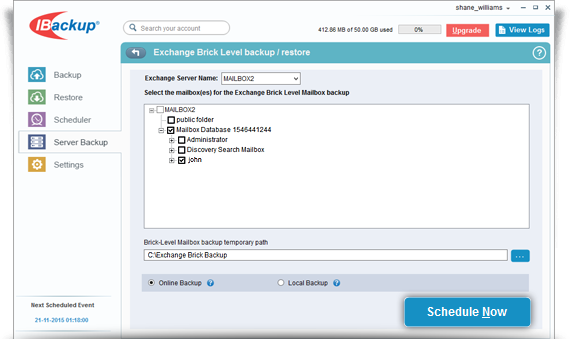
- Select the mailbox database(s) from the list displayed, specify the temporary local backup path.
- Select Online Backup or Local Backup radio button, and click Schedule Now.
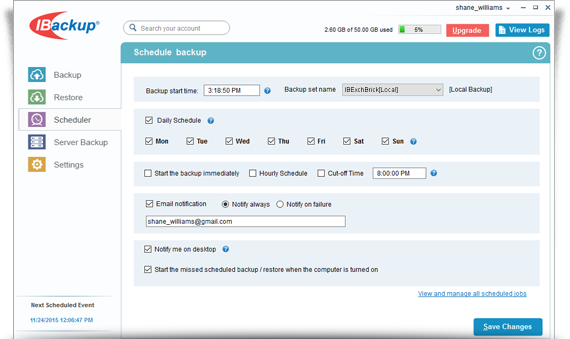
Note: Ensure that the selected temporary location on your computer has sufficient free space to hold the contents of the individual mailboxes of the MS Exchange Server. You cannot select a temporary location on the remote location. - The ‘Schedule backup’ screen is displayed where you can schedule the backup for any future day and time or perform an immediate backup of the selected mailbox databases.
System Requirements
For Exchange Server 2019
- x64 architecture-based computer with Intel processor that supports Intel, 64 architecture (formerly known as Intel EM64T), AMD processor that supports the AMD64 platform
- Windows Server 2019
- Minimum 128 GB of RAM per server and sufficient space in the hard disk to store the MS Exchange Server Mailbox backup files
For Exchange Server 2016
- x64 architecture-based computer with Intel processor that supports Intel, 64 architecture (formerly known as Intel EM64T), AMD processor that supports the AMD64 platform, Intel Itanium IA64 processors not supported
- Windows Server 2012, Windows Server 2012 R2 and Windows Server 2016
- Minimum 8 GB of RAM per server and sufficient space in the hard disk to store the MS Exchange Server Mailbox backup files
For Exchange Server 2013
- x64 architecture-based computer with Intel processor that supports Intel, 64 architecture (formerly known as Intel EM64T), AMD processor that supports the AMD64 platform
- Windows Server 2012 Standard, Windows Server 2008 R2 Standard with Service Pack 1 (SP1), Windows Server 2008 R2 Enterprise with Service Pack 1 (SP1), Windows Server 2008 R2 Datacenter RTM or later
- Minimum 8 GB of RAM per server and sufficient space in the hard disk to store the MS Exchange Server Mailbox backup files
For Exchange Server 2010
- x64 architecture-based computer with Intel processor that supports Intel Extended Memory 64 Technology (Intel EM64T) or AMD processor that supports the AMD64 platform
- Windows Server 2008 Service Pack 2 (SP2) or later or Windows Server 2008 R2
- Minimum 2 GB of RAM per server and sufficient space in the hard disk to store the Exchange Server Mailbox backup files